What to Do If Your Roof Is Leaking: Emergency Response Guide

FINANCE YOUR HOME IMPROVEMENT PROJECT TODAY

0% Financing on
Roof Replacements

With nearly four decades serving homeowners under our belt, we’ve built relationships with trusted lenders who specialize in roofing projects. We can connect you with financing professionals ready to help fund your roof replacement project.

When you work with County Roofing, you get only the best. As little as 0% interest on approval for 5 years, easy pay, and the best craftsmanship in the industry.

Roofing Estimate Home

Key Takeaways:

  • Act immediately when you discover a roof leak—every minute of delay increases water damage
  • Contain the water first by moving belongings and placing buckets to catch drips
  • Document everything with photos for insurance claims before making repairs
  • Call professional roofers rather than attempting DIY fixes that often make problems worse
  • Long Island’s weather makes quick professional response essential to prevent extensive damage

Is water dripping from your ceiling?

That single drop represents an emergency unfolding above your head. While it might seem like a minor inconvenience now, a roof leak never gets better on its own—it only gets worse, faster than most homeowners realize.

Here’s the reality: That small drip you’re watching today could become a collapsed ceiling, ruined insulation, dangerous mold growth, musty odors, and thousands in structural damage within days.

On Long Island, where nor’easters and winter storms test every roof’s limits, roof leaks demand immediate action. Remember, water intrusion doesn’t just stain your ceilings; it can seep into walls and insulation, and even cause water stains or mold on exterior walls.

The good news? Taking the right steps in the first few hours after discovering a leak can mean the difference between a simple repair and a complete roof replacement. In this guide, we’ll walk you through exactly what to do when your roof starts leaking, from immediate emergency response to getting professional help that solves the problem permanently.

Roof Damage: Why Fixing It (Quickly) Matters

Roof damage is more than just an eyesore—it’s a threat to your home’s safety and your family’s comfort. One of the most common and urgent issues homeowners face is a roof leak.

Whether it’s caused by missing or damaged shingles, clogged gutters, or improper installation, a leaky roof can quickly escalate from a minor nuisance to a major problem.

Water intrusion doesn’t just stain your ceilings; it can seep into walls and insulation, leading to costly interior damage, dangerous mold growth, and even compromising the structural integrity of your home.

Ignoring roof leaks or putting off repairs only invites further damage. Over time, what starts as a small drip can rot wood framing, weaken your roof deck, and create the perfect environment for mold to thrive.

That’s why it’s crucial to address any signs of roof damage immediately. A professional roofing contractor has the expertise to identify the source of the leak, assess the extent of the damage, and recommend the right solution to restore your roof properly.

By acting quickly, you can protect your investment, avoid expensive repairs, and keep your home safe and dry.

Immediate Steps When You Discover a Roof Leak

Time matters when water starts entering your home. The longer water flows, the more damage accumulates—not just to your roof, but to everything below it.

Move Valuables Out of Harm’s Way

Water doesn’t discriminate. It’ll ruin your furniture, electronics, clothing, and irreplaceable belongings with equal efficiency.

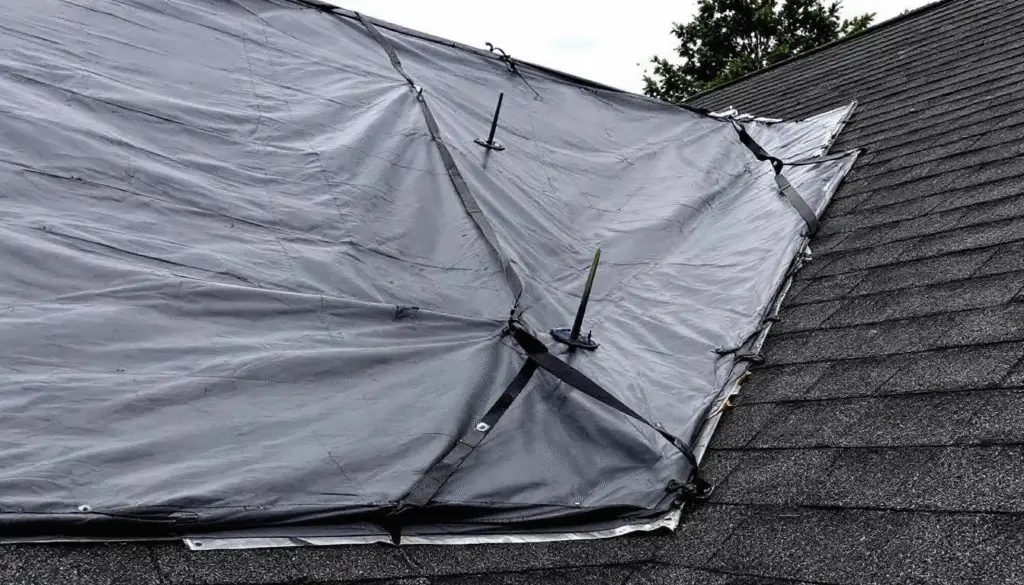
Start by clearing the affected area immediately. Move furniture away from the leak. Relocate electronics, computers, and anything valuable that could be damaged. If you can’t move large furniture pieces, cover them with plastic tarps or waterproof sheeting.

Don’t forget about items stored in closets or cabinets near the leak. Water travels along beams and through walls, often appearing far from where it actually enters your roof.

Contain the Water

Once your belongings are safe, focus on preventing water from spreading throughout your home.

Place buckets, trash cans, or any large containers under active drips. Empty them frequently—a steady leak can fill a five-gallon bucket in under an hour during heavy rain.

Put down towels, tarps, or plastic sheeting to protect flooring. Wood floors are particularly vulnerable to water damage and can warp permanently if left wet. Carpeting soaks up water like a sponge, creating perfect conditions for mold growth.

If you have attic access, place containers there too. Catching water before it reaches your ceiling often prevents drywall damage.

A worried woman stands beneath a leaking ceiling, looking up as water drips into a bucket placed on the floor, indicating a roof leak in her home. This scene highlights the urgency for roof leak repair to prevent further damage and potential water intrusion.

Address Ceiling Bulges Carefully

Sometimes water collects in your ceiling, creating a sagging bulge that looks ready to burst. This is actually more dangerous than an active drip.

Counter-intuitively, you need to puncture that bulge. Use a screwdriver to make a small hole at the lowest point of the sag, with a bucket positioned directly underneath.

Puncturing the bulge relieves water pressure, which helps prevent further structural damage and stops the water from spreading across your ceiling or causing a sudden, uncontrolled collapse.

Yes, you’re making a hole in your ceiling on purpose. But that small, controlled puncture is infinitely better than the alternative—a large section of drywall crashing down along with gallons of water and soaked insulation.

Make multiple punctures if needed for large bulges. Just ensure you have containers ready to catch all that water.

Stop the Flow at the Source (If Safe)

If you can safely access your attic and identify where water is entering, placing a bucket or tarp can minimize interior damage until professional help arrives.

Safety comes first. Never go into an attic during active leaking if there’s any risk of electrical hazards, structural instability, or if you’re not comfortable with the conditions. Your safety is more important than preventing water damage.

If you do venture up, watch your footing. Wet insulation and wood are slippery, and you must step only on ceiling joists—never directly on drywall or insulation, which won’t support your weight.

Document Everything for Insurance

Before you start any cleanup or repairs, pull out your phone and start taking pictures. This documentation is essential for insurance claims.

What to Photograph

Capture the water entry point if you can identify it. Take wide shots showing the extent of damage to ceilings, walls, and floors. Photograph damaged belongings—furniture, electronics, clothing, anything ruined by water.

Get close-ups of specific damage: water stains, warped wood, peeling paint, soaked insulation, or any structural issues. Take photos from multiple angles to show the full scope of the problem.

Don’t forget exterior shots. If you can safely see your roof from the ground, photograph any obvious damage like missing shingles, visible holes, or damaged flashing.

Keep Detailed Notes

Write down when you first noticed the leak, what the weather conditions were, and how much water came through. Note any sounds you heard, like dripping in walls or ceilings before the leak became visible.

Track your emergency response expenses. If you had to rent equipment, buy tarps, or move belongings to storage, keep those receipts. Insurance may cover these costs.

Contact Your Insurance Company Quickly

Call your insurance provider as soon as possible after securing your home. Many policies require prompt notification of damage.

Ask specific questions: Does your policy cover the repairs? Is there a deductible? Do they need to send an adjuster before repairs begin? What expenses can you recover?

Some policies cover the roof repair but not damaged belongings, or vice versa. Understanding your coverage helps you make informed decisions about repairs.

Understanding Roof Types

Not all roofs are created equal, and understanding the type of roof you have is key to preventing roof leaks and ensuring long-term performance.

Asphalt shingles are the most common roofing material for Long Island homes, prized for their affordability and durability. However, they can be vulnerable to high winds, hail, and the region’s temperature swings, which may cause them to crack, curl, or go missing—opening the door to leaks.

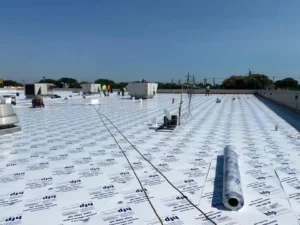
Flat roofs, often found on modern homes and commercial buildings, require a different approach.

These roofs depend on a seamless, waterproof membrane and proper drainage to prevent standing water and leaks. Even a small puncture or clogged drain can lead to significant water intrusion.

Each roof type has its own set of maintenance needs and potential trouble spots. Regular inspections by a professional roofer are essential, no matter what kind of roof you have.

An experienced eye can spot hidden roof leaks, worn materials, or early signs of trouble before they turn into costly repairs. By understanding your roof’s unique requirements and staying proactive, you can prevent leaks and extend the life of your roof.

Common Causes of Leaks

Roof leaks can strike for a variety of reasons, and knowing the most common culprits can help you stay one step ahead. Missing or damaged shingles are a leading cause—just a few shingles blown off in a storm can expose your roof deck to water.

Clogged gutters are another frequent offender; when gutters overflow, water can back up under your roofing materials and find its way inside.

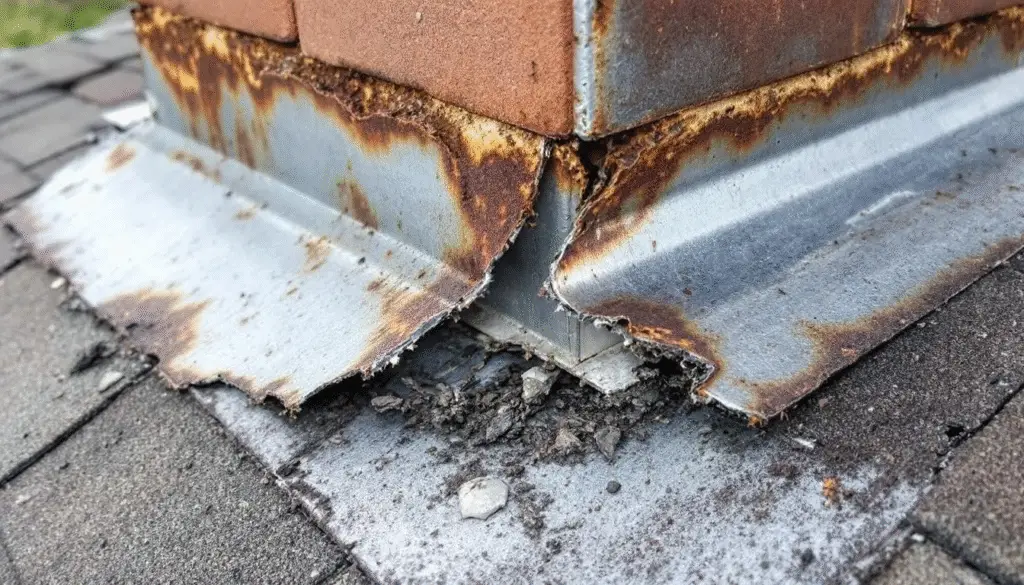
Improper installation of roof vents, plumbing vents, or flashing around chimneys and skylights can leave gaps that allow water to seep in.

Ice dams, which form when melting snow refreezes at the roof’s edge, can trap water and force it beneath shingles, causing leaks even when the rest of the roof appears intact. Poor ventilation and improperly driven nails can also contribute to roof damage, as trapped moisture and loose shingles make your roof more vulnerable to leaks.

Older roofs are especially at risk, as roofing materials naturally deteriorate over time, becoming brittle and less effective at keeping water out.

Even minor issues, like a few damaged shingles or a small crack in the flashing, can lead to significant leaks if left unaddressed. That’s why it’s important to have a professional roofing company inspect your roof regularly, identify the source of the leak, and carry out a thorough repair process.

Routine maintenance—such as applying roofing cement to vulnerable areas and checking all roof penetrations—can help prevent future leaks and keep your roof performing at its best.

Finding the Source of Your Roof Leak

Here’s a frustrating truth: The spot where water drips into your home rarely sits directly under where it enters your roof. Water follows paths of least resistance, traveling along rafters, through insulation, and across surfaces before finally appearing inside your home.

Homeowners should also look for other signs of leaks, such as water stains, mold, or musty odors in unexpected areas.

Why Leaks Are Hard to Locate

Water enters through the damaged spot on your roof, then flows downward and sideways along roof decking until it finds a way through—typically at a seam, around a light fixture, or through the smallest crack in drywall.

This means your ceiling leak in the living room could originate from roof damage in the bedroom. The water traveled 10 feet along a beam before finding its exit point.

Long Island homes face additional challenges. Our freeze-thaw cycles create ice dams that force water under shingles in unexpected ways. Nor’easters drive wind-blown rain into places that stay dry during normal rainstorms.

Common Leak Entry Points

Certain roof areas are particularly vulnerable. Knowing these trouble spots helps professionals find leaks faster:

Flashing around chimneys and skylights deteriorates over time. These waterproof seals prevent water infiltration where your roof meets vertical structures—but only when they’re intact.

Roof valleys channel massive amounts of water during storms. If valley flashing corrodes or comes loose, water pours into your home.

Plumbing vent boots crack as rubber gaskets dry out from sun exposure. These seemingly minor cracks let surprising amounts of water through.

Missing or damaged shingles create obvious entry points. Even one missing shingle during a driving rainstorm can soak your attic.

Step flashing where roof meets walls loosens over time, allowing water to seep behind siding and into wall cavities. The repair process for roof-to-wall flashing depends on the materials involved in both the wall and the roofing, as different materials can affect the choice of flashing and waterproofing methods.

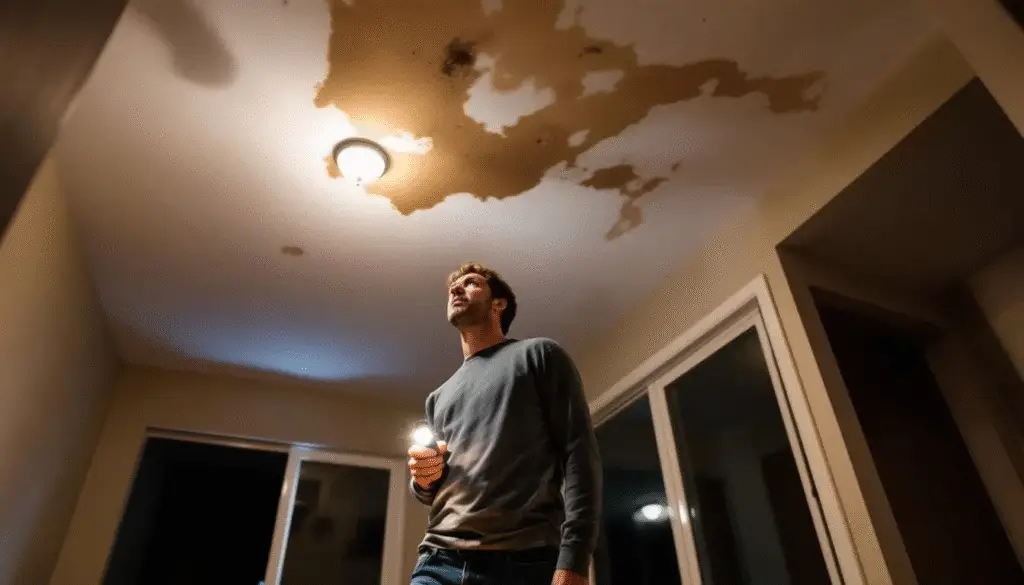
The Attic Investigation

If you have safe attic access, this is where professional leak detection usually starts. Bring a bright flashlight and look for water stains, wet insulation, or active dripping.

Follow water stains upward. They typically lead toward the actual entry point. Look for daylight coming through the roof deck—that’s definitely a problem spot.

Check rafters near roof penetrations first. Chimneys, vents, and skylights are the most common culprits.

HOW TO REPAIR ROOF FLASHING

Why DIY Roof Repairs Usually Fail

Watching YouTube videos might make roof repair look straightforward. The reality is far different, and here’s why attempting DIY leak repairs often creates bigger problems.

Safety Concerns Come First

Roofs are dangerous. Every year, homeowners suffer serious injuries or deaths from roof-related falls. Wet roofs are even more treacherous, especially the steep slopes common on Long Island homes.

You need proper safety equipment—harnesses, rated ladders, non-slip footwear, and someone to spot you. Most homeowners don’t have this gear or the training to use it safely.

Working on roofs also means understanding when conditions are unsafe. After storms, hidden damage could make seemingly solid areas unstable. If you have any safety concerns or if the roof feels unstable, call County Roofing Systems to ensure proper repair and your safety.

Improper Repairs Create New Leaks

Applying roofing cement without understanding proper technique often seals water in rather than out. You’ve just trapped moisture that will rot your roof deck from inside.

Using wrong materials accelerates failure. Not all sealants work with all roofing types. Mismatched materials can actually void your roof warranty. Skylight leaks, for example, are frequently caused by improperly installed flashing or sealant, which allows water to penetrate around the skylight.

Missing the real problem is perhaps the biggest issue. That visible damaged shingle might be a symptom of underlying problems—rotted decking, failed underlayment, or improper ventilation causing moisture issues.

Professionals don’t just fix what’s visible. They identify and address root causes to prevent recurring leaks.

Voiding Warranties

Many roofing material warranties specifically exclude coverage if anyone other than certified contractors performs repairs. That DIY patch job to save money could cost thousands if it voids your warranty.

Homeowner’s insurance also gets complicated. If your repair attempt causes additional damage or fails to prevent further problems, your claim could be denied.

When Professional Help Is Essential

Some situations absolutely require professional roofing contractors. Never attempt DIY repairs if:

Your roof is steep or high. The leak is near edges or complicated roof features. You can’t locate the actual entry point. Multiple areas are leaking. There’s visible structural damage. You’re not comfortable with heights or roof work.

In any of these situations, it’s best to call a professional to ensure your safety and prevent further damage.

Temporary Measures Until Help Arrives

Sometimes you can’t get immediate professional help—contractors are busy after major storms, or it’s the middle of the night. Applying a temporary fix, such as caulking or tarping, can help prevent immediate damage until a permanent repair is made.

These temporary measures can minimize damage until roofers arrive.

Tarp Application Basics

A quality tarp properly secured can prevent additional water intrusion for days or even weeks. But improper tarping sometimes causes more damage than it prevents.

Use heavy-duty tarps, not cheap plastic sheeting. Thin tarps shred in wind and create more problems. You want reinforced poly tarps rated for outdoor use.

The tarp must extend from above the leak down over the roof edge—water needs somewhere to run off. Trying to tarp only the damaged area often traps water underneath.

Secure tarps with 2×4 lumber boards, never just nails or weights that can tear through material. Place boards across the tarp, extending onto undamaged roof surface to anchor it properly.

Interior Waterproofing

If you absolutely cannot address the roof itself, focus on protecting your home’s interior. Plastic sheeting on attic floors can channel water toward collection points.

Create barriers along ceiling joists to direct water away from vulnerable areas. A simple trough made from plastic sheeting and boards can guide water to a bucket instead of letting it spread across your ceiling.

Just remember—these are temporary band-aids. They buy you time but don’t fix the underlying problem. The leak will worsen without proper repairs.

What Not to Do

Don’t apply roofing cement or patches without knowing exactly what you’re doing. Bad repairs make professional fixes harder and more expensive.

Never climb on your roof during rain, at night, or when ice could be present. The risk isn’t worth it.

Don’t ignore small leaks hoping they’ll resolve themselves. They won’t. Every day of delay means more damage accumulating behind your walls and ceilings.

Getting Professional Help

The moment you discover a roof leak, professional roofers should be your first phone call—not your last resort after DIY attempts fail.

Why Professional Expertise Matters

Experienced roofing contractors don’t just patch visible damage. They identify why your roof failed in that spot and address underlying issues.

Professional leak detection saves money long-term. Finding and fixing the real problem prevents recurring leaks that require multiple repair calls.

Certified roofers know Long Island building codes. They pull proper permits when required and ensure all work meets local requirements. This matters for insurance coverage and when you eventually sell your home.

Quality contractors guarantee their work. If the leak returns, they fix it at no additional cost. You can’t get that guarantee from a DIY repair.

What to Expect From a Roofing Company

A reputable Long Island roofer will respond quickly to emergency leak calls. They’ll conduct a thorough inspection to find all leak sources—not just the obvious ones.

You’ll receive a detailed written estimate explaining exactly what’s wrong, what needs fixing, and how much it costs. Never accept vague “we’ll patch it and see” proposals.

Good contractors explain your options clearly. Sometimes repairs make sense. Other times, extensive damage means replacement is the wiser investment.

They’ll work with your insurance company, providing documentation and evidence your insurer needs to process claims efficiently.

Questions to Ask Potential Contractors

Before hiring anyone to fix your leaking roof, get answers to these critical questions:

Are you licensed and insured for roofing work in New York? How long have you been in business on Long Island? Can you provide local references? What’s your warranty on repairs? How quickly can you start? What’s the expected completion timeline?

Request proof of insurance before any work begins. You need to see both liability insurance and workers’ compensation coverage. This protects you if someone gets injured on your property.

The Repair Process

When it comes to roof leaks, a quick patch is never enough—lasting protection requires a thorough, professional repair process. Here’s what you can expect when you call in a professional roofing contractor to address a leaking roof on Long Island.

1. Pinpointing the Source of the Leak

The first and most critical step is identifying the true source of the leak. Hidden roof leaks can be especially tricky, as water often travels far from the entry point before showing up inside your home.

A professional roofer uses specialized tools and years of experience to trace the path of water intrusion, whether it’s coming from missing shingles, damaged flashing, roof penetrations, or even clogged gutters.

2. Removing Damaged Materials

Once the source of the leak is found, the repair process begins by carefully removing any damaged roofing materials.

This may involve taking off a few shingles, scraping away old roofing cement, or lifting up sections of underlayment to expose the roof deck or roof decking beneath. Removing all compromised materials is essential to prevent further damage and ensure a solid foundation for repairs.

3. Inspecting the Roof Deck

With the area exposed, your roofing contractor will inspect the roof deck for signs of rot, water damage, or structural weakness.

If the decking is soft, moldy, or deteriorated, it will need to be repaired or replaced before new roofing materials are installed. Addressing these issues now helps maintain the structural integrity of your roof and prevents future leaks.

4. Repairing and Replacing Roofing Materials

Depending on the cause of the leak, the next step may involve installing new shingles to match your existing roof, applying fresh roofing cement to seal vulnerable areas, or replacing missing or damaged flashing around roof vents, chimneys, or other roof penetrations.

If clogged gutters or downspouts contributed to the problem, these will be cleared to restore proper water flow and prevent water from backing up under your roofing materials.

5. Addressing Related Issues

A thorough repair doesn’t stop at the roof surface. Your contractor will also check for water stains, mold growth, or other signs of water damage on exterior walls and in your attic.

If poor ventilation, ice dams, or storm damage are found to be contributing factors, your roofer will recommend solutions—such as improving attic airflow or installing water shields in vulnerable roof valleys—to prevent future leaks.

6. Ensuring Proper Installation

Improper installation is a leading cause of roof leaks, especially with asphalt shingles and flashing.

Professional roofers use the right techniques and materials for your specific roof type, ensuring that everything from roofing nails to new flashing is installed to manufacturer and code standards. This attention to detail helps prevent future leaks and protects your warranty.

7. Ongoing Maintenance and Prevention

After repairs are complete, your roofing company will advise you on regular maintenance to keep your roof in top shape.

This includes annual inspections, cleaning clogged gutters, checking for missing or damaged shingles, and monitoring for signs of poor ventilation or water intrusion. Staying proactive is the best way to extend the life of your roof and avoid costly repairs down the line.

When Is Full Replacement Needed?

Sometimes, a roof leak is a symptom of more extensive problems—such as a failing roof valley, widespread storm damage, or an aging roof deck.

In these cases, your contractor may recommend a full replacement to ensure your home stays protected. A reputable professional will walk you through your options and help you make the best decision for your home and budget.

Trust the Experts for Lasting Results

The repair process for a roof leak is complex and requires expert knowledge of roofing materials, installation techniques, and local weather challenges. By working with a professional roofing company, you can be confident that your roof will be repaired properly, preventing further damage and future leaks.

Regular maintenance and timely repairs are the keys to a secure, leak-free home—so don’t wait until a small leak becomes a big problem. Call County Roofing Services to protect your investment and your peace of mind.

THE BEST WARRANTIES IN THE INDUSTRY- ONLY 2% OF ROOFING COMPANIES CAN OFFER

25-Year Labor, 50-Year Material Warranty

We’ve met the toughest requirements in the residential roofing industry- and we use only the best materials.

That’s why we stand behind our work with the best warranties in the industry- warranties only 2% of the roofing industry can offer. 

Your house deserves the best roofing warranty on the market. Give us a call today and get a brand new roof with a 25-year labor, 50-year material warranty from the best roofing contractor throughout Long Island and New York.

Roofing Estimate Home

Preventing Future Roof Leaks

Once you’ve dealt with the immediate crisis, focus on preventing the next one. Long Island’s weather guarantees your roof takes constant abuse—proper maintenance helps it survive.

Regular Inspection Schedule

Have your roof professionally inspected every year, ideally in spring before storm season hits. Annual inspections catch small problems before they become leak emergencies.

Inspect your roof yourself after major storms. You don’t need to climb up—a good pair of binoculars lets you spot obvious damage from the ground. Look for missing shingles, damaged flashing, or debris accumulation.

Check your attic periodically for signs of moisture, even when it’s not raining. Water stains, mold growth, or damp insulation indicate leaks you haven’t noticed yet.

Maintenance That Prevents Leaks

Keep gutters clean and functioning properly. Clogged gutters force water to back up under shingles, creating leaks that shouldn’t exist.

Trim overhanging tree branches before they damage your roof in windstorms. Branches also drop leaves and debris that trap moisture and accelerate roof deterioration.

Address minor damage immediately. Replacing a few damaged shingles costs hundreds. Waiting until water damage requires replacing the entire roof section costs thousands.

Ensure proper attic ventilation. Many “roof leaks” are actually condensation problems from inadequate ventilation. Proper airflow prevents moisture buildup that mimics leak damage.

Know Your Roof’s Age

Roofing materials have finite lifespans. Asphalt shingles typically last 20-30 years on Long Island, depending on quality and weather exposure.

If your roof approaches the end of its expected lifespan, budget for replacement rather than continuing to patch. Frequent repairs on an old roof cost more than just replacing it.

Protect Your Long Island Home Today

Roof leaks are emergencies that demand immediate action and professional expertise. The steps you take in the first hours after discovering a leak directly determine how much damage your home sustains and how much your repairs ultimately cost.

Remember the essentials: Move belongings to safety, contain water actively coming in, document everything for insurance, and call professional roofers immediately. These simple actions prevent a manageable leak from becoming a catastrophic failure.

County Roofing Systems has protected Long Island homes from roof leaks for over 35 years. Our emergency response team understands exactly what your roof needs to survive our demanding coastal climate. We’ve seen every type of leak Long Island weather can create, and we know how to fix them permanently.

Don’t let a roof leak turn into extensive water damage, dangerous mold growth, or structural failure. Call County Roofing Systems today at (631) 608-5757 for immediate emergency leak response. We’ll identify the source of your leak, stop the water intrusion, and provide honest recommendations for repairs that protect your home for years to come.

Your roof leak won’t fix itself, but we can fix it right—the first time.

FINANCING YOUR ROOF REPLACEMENT PROJECT HAS NEVER BEEN EASIER
First Approvals

0% financing

No income check

Up to 15 years

Monthly payments as low as $149
CALL TODAY

Call or Contact Us Today for a FREE roofing estimate:

Roofing Estimate Home