How to Repair a Flat Roof:
A Complete Guide to Flat Roof Repair
FINANCE YOUR HOME IMPROVEMENT PROJECT TODAY
0% Financing on
Roof Replacements
With nearly four decades serving homeowners under our belt, we’ve built relationships with trusted lenders who specialize in roofing projects. We can connect you with financing professionals ready to help fund your roof replacement project.
When you work with County Roofing, you get only the best. As little as 0% interest on approval for 5 years, easy pay, and the best craftsmanship in the industry.
Key Takeaways:
- Ponding water is the #1 flat roof killer – any water sitting for 48+ hours after rain needs immediate attention
- Material matters for repairs – EPDM, TPO, and PVC each require specific repair techniques and can’t be mixed
- Small repairs cost $150-$500, moderate damage runs $300-$1,100, extensive repairs hit $1,200-$4,000+
- DIY repairs work for minor EPDM patches only – TPO and PVC need professional heat-welding equipment
- Replace instead of repair when costs exceed 50% of replacement or your roof is past 75% of its expected lifespan
UPDATED FOR 2025
The Problem No One Sees Until It's Too Late
You walk into your living room and notice a brown stain spreading across the ceiling.
Your flat roof has been leaking for weeks, maybe months, and you’re just now seeing the damage.
Water doesn’t always show up immediately where it enters your home. It travels along roof decking, drips through insulation, and eventually finds a low point to make its appearance.
By then, what could’ve been a $300 repair becomes a $3,000 emergency.
The good news? Most flat roof problems are fixable when you catch them early. Understanding what goes wrong, recognizing the warning signs, and knowing when to call for professional help keeps your repair costs manageable and your home protected.
Why Flat Roofs Develop Problems Faster Than Sloped Roofs
Gravity isn’t your friend when you’ve got a flat roof.
Unlike a pitched roof that sheds water immediately, flat roofs allow water to linger. That minimal slope—usually just 1/4 inch per foot—means water moves slowly across your roof surface, giving it plenty of time to find cracks, separated seams, and weak spots in your membrane.
UV exposure hammers flat roofs harder than pitched ones. Direct sunlight beating down on horizontal surfaces all day long breaks down roofing materials faster, making them brittle and prone to cracking.
Temperature swings create constant stress. Your roof expands in summer heat and contracts in winter cold, working seams loose and stressing flashing connections around every penetration—vents, pipes, HVAC units, skylights.
Then there’s the weight issue. Snow and pooled water add hundreds of pounds per square foot to your roof structure. Over time, this can cause sagging that creates even more low spots where water collects.
The Most Common Flat Roof Problems
Ponding Water: The Silent Roof Killer
Walk across your flat roof two days after heavy rain. If you see standing water, you’ve got a drainage problem that needs immediate attention.
Ponding happens for several reasons. Improper installation—when contractors don’t build in adequate slope—tops the list. Building settlement gradually shifts the roof structure enough to create new low spots. Clogged drains and scuppers prevent water from leaving the roof entirely.
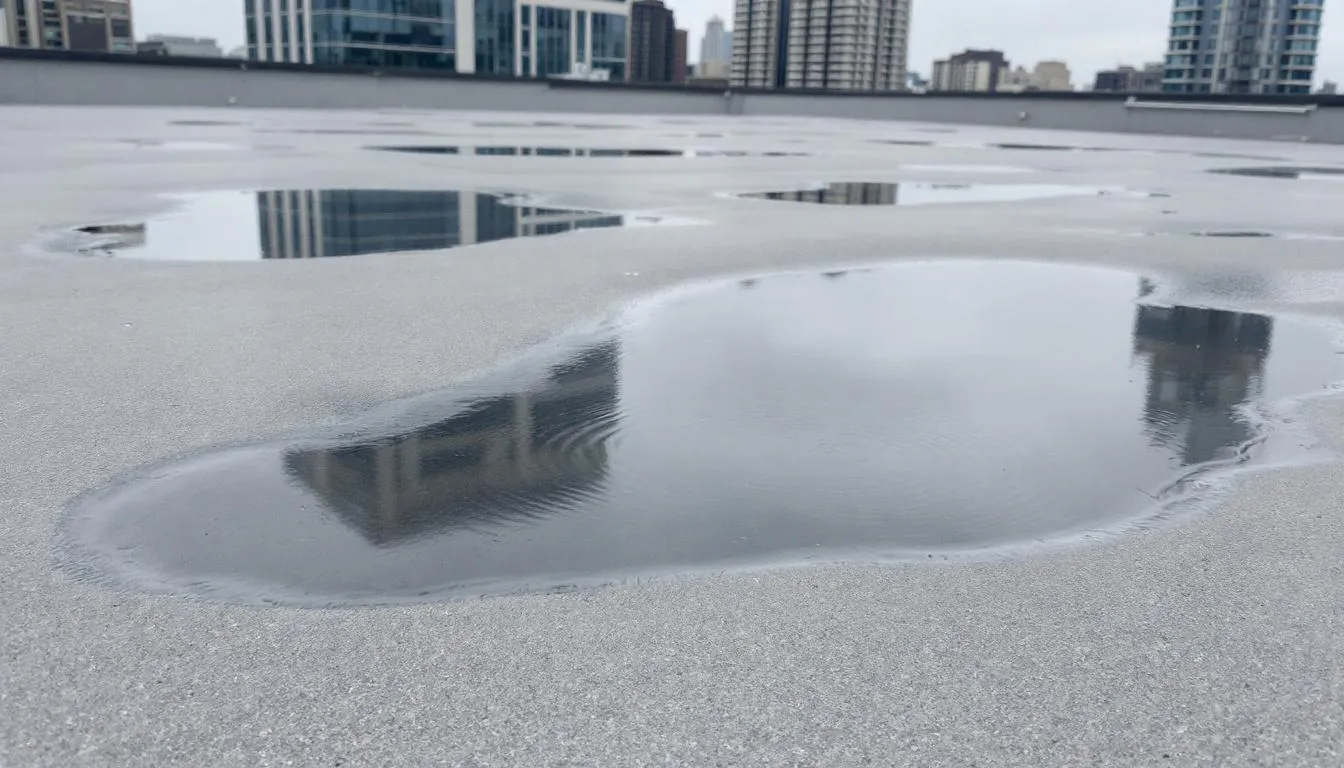
Here’s what makes ponding so destructive: As water slowly evaporates, it leaves behind dirt and debris that eventually supports moss, algae, and vegetation growth. Yes, plants growing on your roof—all working to break down your membrane from the surface.
The standing water acts like a magnifying glass, concentrating UV rays on those exact spots and accelerating breakdown. The weight deflects your roof deck deeper, creating an even bigger depression that holds more water. Left unchecked, the moisture can lead to mold growth in your attic and interior spaces. It’s a downward spiral.
Membrane Tears, Punctures, and Cracks
Your flat roof membrane is one continuous barrier against water. Any breach is a leak waiting to happen.
Punctures from foot traffic, dropped tools during HVAC maintenance, or falling branches create immediate problem spots. These aren’t always obvious from inside your building—you might not see interior damage until weeks or months later.
Thermal cycling causes cracks even in quality membranes. As temperatures swing from summer highs to winter lows, your roof expands and contracts constantly.
Over years of this movement, stress concentrates at weak points: around penetrations, along seams, where different materials meet. Small hairline cracks appear, then widen with each temperature cycle until water finds its way through.
Blistering shows up frequently on built-up roofing systems. When moisture gets trapped between layers—either during installation or from vapor moving up through your building—it creates pockets beneath the surface membrane. These blisters look like bubbles or raised areas that eventually rupture, exposing underlying layers to weather damage.
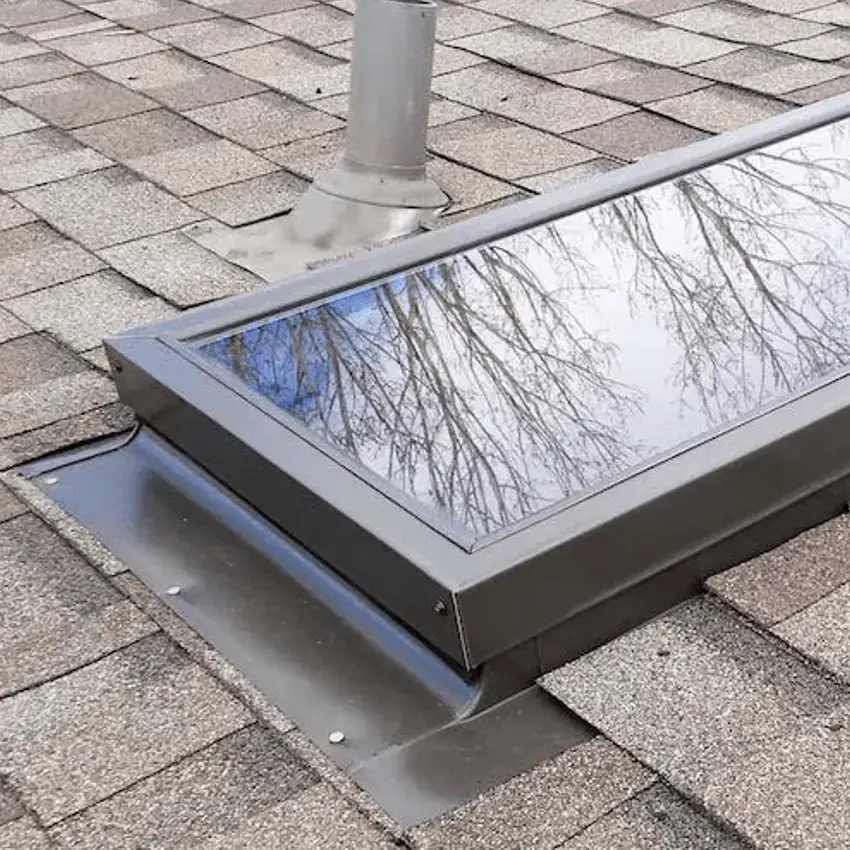
Flashing Failures: Where Most Leaks Start
Every pipe, vent, skylight, and HVAC unit penetrating your flat roof creates a potential leak point. Flashing failures account for roughly 70% of flat roof leaks.
The metal or membrane material sealing these transitions takes a beating from temperature extremes and physical stress. Materials expand and contract at different rates than the surrounding membrane, working sealant loose over time.
Wind-driven rain finds these gaps and infiltrates the roofing system.
Rusted or corroded metal flashing makes the problem worse. The material loses structural integrity and can’t maintain a watertight seal anymore. While metal roof systems on pitched roofs handle this differently, flat roof flashing requires constant vigilance against these failure points.
Parapet walls present their own challenges. That transition between vertical wall and horizontal roof needs careful detailing. When metal cap flashing deteriorates or sealant fails, water runs down inside the wall cavity—often showing up as interior damage far from the actual failure point.
Seam Separation and Deterioration
Single-ply membranes like TPO, EPDM, and PVC come in large sheets that must be joined together. These seams are your roofing system’s weakest links.
They rely on adhesive, heat welding, or tape to create watertight bonds. Over time, seams can separate due to thermal stress, improper installation, or material breakdown.
With EPDM roofs, adhesive-bonded seams lose grip as adhesive degrades from UV exposure and temperature cycling. Tape-sealed seams peel back if moisture gets underneath.
TPO and PVC heat-welded seams are generally more durable, but even these fail if welding wasn’t done properly during installation.
Seam problems typically appear first along roof perimeters and around penetrations, where stress is highest. As separation progresses, gaps widen, allowing water between membrane layers and into insulation and roof deck below.
How to Repair Different Flat Roof Materials
Now, let’s talk about how to repair different flat roof materials.
Even if you don’t go the DIY route and realize a professional is the way to go, it can help knowing what needs to be done to repair your roof.
Here’s a breakdown based on the type of flat roof material:
Repairing EPDM Rubber Roofs
EPDM is forgiving when it comes to repairs. The synthetic rubber membrane responds well to patches, making it relatively DIY-friendly for small fixes—though we still recommend professional installation for anything beyond minor touch-ups.
For small punctures or tears under 6 inches, the process is straightforward.
Clean the damaged area thoroughly with EPDM-specific cleaner to remove dirt, oils, and oxidation. Cut an EPDM patch extending at least 3-4 inches beyond the damage in all directions, rounding corners to prevent peeling.
Apply EPDM bonding adhesive to both the existing roof surface and patch, let it become tacky per manufacturer instructions, then press firmly into place. Work from center outward to eliminate air bubbles.
Larger repairs require more extensive work. For damage exceeding 6 inches, or multiple small repairs in the same area, professionals typically remove a larger membrane section and install new material. This involves cutting out damaged sections, preparing substrate, applying fresh adhesive, and installing new EPDM that overlaps existing membrane by at least 6 inches on all sides.
Seam repairs on EPDM roofs are particularly critical. If you’ve got separation, simply re-taping isn’t always sufficient.
Professional roofers clean both surfaces, apply new bonding adhesive or permanent-rated EPDM seam tape, and use a seam roller to ensure complete contact. Some contractors apply EPDM-compatible sealant over the seam for extra protection.
Repairing TPO Roofs
TPO repairs require specialized equipment because the material is heat-welded rather than glued.
This makes TPO repairs more durable once completed, but they’re not DIY-friendly—you need a hot air welder and experience using it properly.
For punctures and small tears, repair involves cutting a TPO patch matching your existing membrane thickness (usually 45, 60, or 80 mil). Clean both surfaces with TPO cleaner, then use a hot air welder to fuse patch to existing membrane.
The welder heats both pieces to around 500°F. A silicone roller presses them together while material is hot and pliable, creating a permanent molecular bond.
Seam repairs are where TPO differs significantly from EPDM. Failed TPO seams need re-welding using the same hot-air technique. Roofers clean the separated seam, overlap material properly, then weld it together with consistent heat and pressure.
A properly welded TPO seam should be as strong as original membrane—when samples are pull-tested, the membrane itself usually fails before the seam does.
TPO shrinkage is a known issue with some formulations, particularly older products. If your TPO roof is experiencing widespread shrinkage—pulling away from perimeters, causing seam stress, creating tension around penetrations—patching alone won’t solve the problem. You’re looking at either full membrane replacement or a restoration coating system that can accommodate movement.
Repairing PVC Roofs
PVC represents the premium end of single-ply membranes. Fortunately, it’s also quite repairable.
PVC’s flexibility and chemical resistance mean it handles temperature extremes better than TPO and typically experiences fewer shrinkage issues.
PVC repairs follow similar heat-welding process to TPO since both are thermoplastic materials. The key difference is PVC requires slightly different welding temperatures and techniques.
PVC patches must be made from the same type of PVC membrane—you can’t mix manufacturers’ products because chemical composition varies.
For small repairs, cut a PVC patch with rounded corners extending several inches beyond damage. Clean thoroughly with PVC cleaner (don’t use generic solvents that might damage membrane), then heat-weld patch in place using appropriate temperature settings for PVC (typically 450-550°F depending on membrane thickness).
PVC flashing repairs are common because the material is often used for detailed work around penetrations. When flashing fails, repair involves removing damaged sections, preparing new PVC flashing material, and heat-welding it to both field membrane and vertical surfaces. Proper detailing is critical.
One PVC advantage: it’s highly resistant to chemicals, oils, and grease. This makes it ideal for restaurant roofs or commercial buildings where rooftop equipment might leak fluids. Chemical resistance means PVC maintains integrity better over time in harsh environments.
Repairing Modified Bitumen and Built-Up Roofs
Modified bitumen and built-up roofing systems use asphalt-based materials in multiple layers. These systems are more forgiving of minor damage than single-ply membranes, but repairs require different techniques and materials.
For modified bitumen, small blisters can often be cut open, dried out, filled with roofing cement, and pressed flat. Apply a patch of matching modified bitumen over the repair area, heating it with a torch or hot mop to bond it to existing surface.
Patch should extend at least 6 inches beyond repair in all directions.
Larger damaged areas require removing compromised sections down to sound material—or all the way to roof deck if multiple layers are damaged. Install new layers of modified bitumen, torching each layer to the one below it, and extend new material well beyond damaged area to ensure proper overlap and weatherproofing.
Built-up roofs follow similar principles but involve more layers. For BUR systems, you’re working with multiple plies of roofing felt alternated with hot asphalt or cold adhesive. Repairs involve removing damaged plies, applying new felt and asphalt in proper sequence, and topping with flood coat covered with gravel if that matches existing roof.
The biggest challenge with bitumen and BUR repairs is matching the existing system. You need to know how many plies are in your current roof and what materials were used. A 3-ply BUR repair won’t perform well if you only install a 2-ply patch.
Flat Roof Repair Costs: What to Expect
Understanding costs helps you budget appropriately and recognize whether contractor estimates are reasonable. National averages provide a baseline, but your actual costs vary based on location, roof accessibility, material type, and damage extent.
Small Repairs and Patches
For minor damage like small punctures, isolated tears, or single blister repairs, expect to pay $150 to $500 for professional service.
This typically includes service call, inspection, materials, and labor for straightforward patch work.
DIY repairs with purchased patch kits run $30 to $100 in materials, but remember—if you don’t have experience with your specific membrane type, a botched DIY repair can make problems worse and cost more to fix professionally later.
Moderate Damage and Seam Repairs
When dealing with multiple repair locations, seam failures, or damage covering several square feet, professional repair costs increase to $300 to $1,100.
This is where most homeowners find themselves when they’ve caught problems before they became catastrophic.
Seam repairs specifically can run $200 to $600 depending on total linear footage needing attention and whether it’s simple re-sealing or complete seam reconstruction. EPDM seam repairs tend to cost less than TPO or PVC because they don’t require heat-welding equipment.
Extensive Repairs and Flashing Replacement
For comprehensive repairs involving multiple problem areas, extensive flashing replacement around penetrations, or repairs covering 100+ square feet of membrane, you’re looking at $1,200 to $4,000 or more.
Complete flashing replacement around roof perimeter or parapet walls adds $400 to $1,000 to repair costs. Individual penetration flashing (vents, pipes, skylights) runs $75 to $250 each depending on complexity.
If ponding water requires drainage improvements—installing additional drains, tapered insulation to improve slope, or scupper upgrades—factor in $500 to $3,000 depending on solution.
Roofing contractor labor rates vary significantly by region. Expect $50 to $150 per hour for professional services, with most flat roof repairs taking 2-8 hours depending on complexity.
THE BEST WARRANTIES IN THE INDUSTRY- ONLY 2% OF ROOFING COMPANIES CAN OFFER
25-Year Labor, 50-Year Material Warranty
We’ve met the toughest requirements in the residential roofing industry- and we use only the best materials.
That’s why we stand behind our work with the best warranties in the industry- warranties only 2% of the roofing industry can offer.
Your house deserves the best roofing warranty on the market. Give us a call today and get a brand new roof with a 25-year labor, 50-year material warranty from the best roofing contractor throughout Long Island and New York.
DIY Flat Roof Repair: When It Makes Sense (and When It Doesn’t)
The question “Can I fix this myself?” depends heavily on your skills, damage scope, and roof material type.
In general, it’s best to go with a roofing professional for the sake of safety and ensuring the job gets done right. After all, if you don’t properly repair your roof, it could lead to not only the problem coming back- but coming back worse.
With that said, let’s look a bit deeper into when DIY makes sense:
Repairs You Might Handle Yourself
Small, isolated repairs on EPDM roofs are most DIY-friendly. If you’ve got a single puncture smaller than a silver dollar, the damaged area is easily accessible, and you’re comfortable working on your roof, an EPDM patch kit can get you through.
Cleaning clogged drains and scuppers is another task most homeowners can handle. Remove debris, flush drains with water, ensure water flows freely off roof. This preventive maintenance prevents ponding water problems from developing.
Applying roof coating or sealant to extend roof lifespan is borderline DIY. Actual application isn’t technically difficult—it’s basically painting—but thorough surface preparation is critical. Any areas you miss or apply coating improperly can actually trap moisture and cause more damage.
Repairs That Need Professional Expertise
Heat-welded repairs on TPO and PVC roofs are not DIY projects. Professional roofers invest thousands in hot air welding equipment and spend years perfecting the technique.
Improper welding creates seams that look fine but fail within months, often not showing problems until after you’ve got water damage inside your home.
Extensive repairs covering large areas require professional assessment of underlying roof structure. You’re not just fixing membrane—you need to verify insulation, roof deck, and structural support remain sound.
Professionals have training to identify hidden damage that could compromise your entire roofing system.
Flashing repairs around penetrations and perimeter edges demand expertise in proper detailing. The way flashing integrates with membrane, how it’s secured to vertical surfaces, and sequencing of layers all matter tremendously. Get it wrong and you’ve created a leak point causing thousands in damage.
Any situation involving structural concerns—sagging roof deck, water-damaged wood, compromised insulation—requires immediate professional attention. These issues impact your building’s structural integrity and potentially your safety.
The Hidden Costs of DIY Mistakes
Here’s what many homeowners don’t consider: a failed DIY repair often costs more to fix properly than hiring a professional from the start.
Roofers charge extra to remove improperly installed patches, clean up incorrectly applied sealants, and repair damage caused by inappropriate materials or techniques.
Manufacturers’ warranties often require professional installation and may be voided if you attempt DIY repairs. If your roof is still under warranty, any DIY work could eliminate coverage for future problems.
The biggest hidden cost? Water damage to your building’s interior. A small roof leak can cause thousands in damage to ceiling, insulation, electrical systems, and personal property. Professional repairs come with warranties and insurance backing. Your DIY work? That’s entirely on you if something goes wrong.
Preventive Maintenance: Stop Problems Before They Start
The best flat roof repair is the one you never have to make.
Regular preventive maintenance dramatically extends roof lifespan and catches small problems before they become expensive emergencies.
Professional roof inspections should happen twice yearly—once in spring after winter weather, again in fall before harsh conditions return. These inspections cost $150 to $400 but can identify issues when repairs are still minor and inexpensive.
Keep your flat roof clean. Schedule professional cleaning annually or clean it yourself if you’re comfortable working at height.
Remove all debris, leaves, and dirt that can trap moisture against membrane. Clear vegetation immediately—it doesn’t belong on your roof and will cause damage.
Inspect your roof after every major storm. Look for obvious damage like tears, displaced membrane, or new areas of ponding water. Check inside your building for any signs of water infiltration—stains on ceilings, water running down walls, or damp insulation in attic space.
Maintain your drainage system religiously. Clean gutters, drains, and scuppers at least twice annually—more often if you have nearby trees dropping leaves and debris.
Water that can’t escape your roof will find somewhere to go, and that somewhere is usually through your roofing membrane and into your building.
Consider applying protective coating every 5-7 years. Roof coatings add a reflective layer that reduces UV damage, helps seal minor cracks, and can add years to your roof’s functional life. Elastomeric, acrylic, or silicone coatings run $1-$4 per square foot installed and typically pay for themselves through extended roof life and improved energy efficiency. While metal roof coatings work differently, flat roof coatings provide similar protective and energy-saving benefits.
When to Repair vs. When to Replace Your Flat Roof
Sometimes repair isn’t the answer—you’re just throwing good money after bad.
Clear Signs You Need Replacement, Not Repair
If repair costs exceed 50% of replacement cost, replacement makes more financial sense. At that point, you’re spending nearly as much for a patch job as you would for replacing the entire roof with fresh warranty and decades of expected service life. When considering roof replacements, this 50% threshold is the critical decision point.
Widespread membrane deterioration—not just a few isolated problems, but damage across 30% or more of roof surface—signals your roof has reached end of useful life. Patching one area while the rest is in similar condition just delays the inevitable. When evaluating roof replacements, consider that newer materials often offer better energy efficiency and longer warranties than what you currently have.
Age is a critical factor. Most flat roofing materials have expected lifespans: EPDM (15-25 years), TPO (15-20 years), PVC (20-30 years), modified bitumen (10-20 years), built-up roofing (15-30 years).
If your roof is within a few years of its expected lifespan and experiencing multiple problems, replacement is usually the smarter choice.
Recurring leaks in the same area despite repairs indicate underlying structural problems or installation defects that patching can’t fix. Chronic ponding water that keeps returning even after drainage improvements suggests roof structure has sagged beyond the point where repairs can adequately address the issue.
When Repair Is the Right Answer
If your roof is less than halfway through expected lifespan and damage is isolated to specific areas, repair is absolutely the right call. A well-maintained 8-year-old TPO roof with a few punctures from storm damage doesn’t need replacement—it needs targeted repairs.
Single-point failures—one major penetration flashing failure, localized seam separation, or damage from a fallen tree branch—are perfect repair candidates. Address the specific problem, implement preventive measures to prevent recurrence, and you’ll get years more service from the roof.
When you’ve invested in regular maintenance and caught problems early, repair costs stay manageable and effectiveness remains high. This is the ideal scenario: routine inspections identify small issues, you repair them promptly, and your roof reaches or exceeds expected lifespan.
Budget constraints sometimes necessitate repair over replacement, but be honest about whether you’re solving the problem or just delaying the inevitable. A $1,500 repair that buys you 3-5 more years makes sense. A $3,000 repair on a 20-year-old roof that’s going to need replacement in 18 months? You’re probably better off biting the bullet and replacing now.
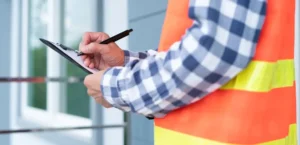
Choosing the Right Roofing Contractor for Flat Roof Repairs
Not all roofing contractors have experience with flat roof systems.
Many residential roofers focus primarily on shingle work and lack specialized knowledge and equipment for single-ply membrane repairs.
Look for contractors with specific flat roofing experience. Ask how many flat roof repairs they complete annually and whether they’re certified by major manufacturers (GAF, CertainTeed, Carlisle, Firestone, etc.).
Manufacturer certifications indicate the contractor has received proper training on installation and repair techniques for specific roofing products.
Verify licensing, insurance, and bonding. Any roofing contractor you hire should carry general liability insurance and workers’ compensation coverage. Request certificates of insurance and verify they’re current—don’t just take the contractor’s word for it. A qualified roofing professional will have no problem providing proof of coverage.
Get multiple detailed estimates. Three estimates from different contractors help you understand scope of work needed and whether pricing is reasonable.
Be wary of estimates that vary dramatically—either someone missed something significant or someone isn’t being honest about what’s needed.
Check references and review online feedback. Ask for recent customer references, specifically customers who had similar repair work done.
Look up contractors on Google Reviews, Better Business Bureau, and social media to see what past customers say about their experience.
Ask about warranties. Reputable contractors warranty their workmanship separately from manufacturer material warranties. Expect at least a 1-2 year labor warranty on repair work. If a contractor won’t stand behind their work, find someone who will.
Protect Your Long Island Home with Expert Flat Roof Repair
Flat roof problems cause stress—you need fast, reliable repairs that actually solve the problem without breaking your budget.
For over 35 years, County Roofing Systems has been protecting Long Island and Westchester County homes with expert flat roofing services. Our certified professionals specialize in all flat roof materials: EPDM, TPO, PVC, modified bitumen, and built-up roofing systems.
We use manufacturer-certified techniques and premium materials to ensure repairs that last. When we complete a repair, it’s backed by our comprehensive workmanship warranty—because we stand behind every job we do.
We don’t push unnecessary work. Sometimes all you need is a targeted repair. Sometimes a coating system extends your roof’s life by another decade. And yes, sometimes replacement is the honest answer.
We’ll give you the straight story about what your roof needs, explain your options clearly, and respect your decision about how to proceed.
Every flat roof repair project starts with a thorough inspection. We don’t just fix obvious damage—we identify why the problem occurred and recommend preventive measures to keep it from happening again.
That might mean improving drainage, upgrading flashing details, or implementing a maintenance schedule. Our goal is solving the root cause, not just patching symptoms.
Ready to fix your flat roof the right way? Call County Roofing Systems today for a free inspection and honest assessment of your flat roof repair needs.
We’ll explain exactly what’s wrong, what it takes to fix it properly, and what you can expect the repairs to cost—no surprises, no pressure, just expert guidance from a roofing team you can trust.
Frequently Asked Questions
How long does a flat roof repair last?
Can you repair a flat roof yourself, or should you hire a professional?
How much does it cost to fix a leaking flat roof?
When should you replace a flat roof instead of repairing it?
How can you tell if your flat roof is leaking?