How to Install Metal Roofing:
A Complete Step-by-Step Guide
FINANCE YOUR HOME IMPROVEMENT PROJECT TODAY
0% Financing on
Roof Replacements
With nearly four decades serving homeowners under our belt, we’ve built relationships with trusted lenders who specialize in roofing projects. We can connect you with financing professionals ready to help fund your roof replacement project.
When you work with County Roofing, you get only the best. As little as 0% interest on approval for 5 years, easy pay, and the best craftsmanship in the industry.
Key Takeaways:
- Metal roofing lasts 50-70 years and reflects heat to reduce cooling costs
- DIY installation is possible for simple structures, but professional installation is recommended for residential homes
- Proper underlayment and precise fastener placement are critical for preventing leaks
- Standing seam and corrugated panels require different installation techniques
- Long Island’s coastal climate demands special attention to flashing and weatherproofing
Is Installing a Metal Roof on Your Own Worth the Risk?
Here’s something most Long Island homeowners don’t know: a single misplaced screw in a metal roof can create leaks that go unnoticed for years, slowly rotting your roof deck from underneath.
Metal roofing offers incredible durability and energy savings—lasting up to 70 years while reflecting heat to cut cooling costs by up to 25%. But installation mistakes can void warranties, create persistent leaks, and even lead to dangerous accidents. Before you tackle this project yourself, you need to understand exactly what’s involved.
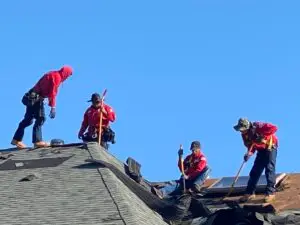
While experienced DIYers can install metal roofing on sheds or simple structures, residential installations are complex and potentially dangerous. This guide walks you through the complete process so you can make an informed decision about whether to DIY or hire professionals.
[ADD IMAGE: Professional roofer installing metal roofing panels on Long Island home]
What Is Metal Roofing?
Metal roofing consists of interlocking panels or shingles made from steel, aluminum, copper, or zinc. Unlike traditional asphalt shingles that absorb heat and deteriorate over time, metal roofing reflects solar radiation and withstands extreme weather conditions.
The two main types are exposed-fastener panels (corrugated metal with visible screws) and standing seam panels (concealed fasteners with raised seams). Exposed-fastener systems are more budget-friendly and easier to install, while standing seam provides superior weather protection and a sleeker appearance. For more information on different roofing materials and styles, check out our complete guide to Long Island roofing options.
Metal roofing works through a layered system—starting with a solid roof deck, followed by underlayment for moisture protection, then the metal panels secured with specialized fasteners. Each layer must work together to shed water effectively and prevent leaks.
Why Choose Metal Roofing for Your Long Island Home?
Long Island’s coastal climate is particularly tough on roofing materials. Intense summer heat, winter ice storms, nor’easters, and salt air exposure all take their toll on traditional roofing.
- Metal roofing solves these problems:
- Exceptional longevity: While asphalt shingles last 15-25 years in Long Island’s climate, metal roofs last 50-70 years with minimal maintenance. That’s likely the last roof you’ll ever install.
- Storm resistance: Metal roofing withstands winds up to 140 mph and sheds snow and ice efficiently—critical for handling Long Island nor’easters. The interlocking panel design prevents wind-driven rain from penetrating your roof.
- Energy efficiency: Metal reflects up to 70% of solar energy, keeping your attic cooler and reducing air conditioning costs. With Long Island’s hot, humid summers, this translates to significant savings.
- Fire resistance: Metal roofing carries a Class A fire rating, the highest available. In areas with dry summer conditions, this provides valuable peace of mind.
- Low maintenance: Unlike asphalt shingles that require regular moss removal and periodic replacement, metal roofs need only occasional inspections and gutter cleaning.
PROTECTION & PEACE OF MIND ONLY 2% OF ROOFING COMPANIES CAN OFFER
The BEST Roofing Warranties In the Industry
We’re a CertainTeed SELECT Shingle Master. That means we’ve met the toughest requirements in the residential roofing industry.
CertainTeed stands behind our work with the best warranties in the industry- warranties only 2% of the roofing industry are certified to offer.
Your house deserves the best roofing warranty on the market. Give us a call today and get a CertainTeed shingle roof with a 25-year labor, 50-year material warranty from the best roofing contractor throughout Long Island and New York.
Essential Tools and Materials for Metal Roof Installation
Before you begin, gather these materials:
Metal roofing panels (cut to your roof length)
Ice and water shield underlayment
Roofing felt or synthetic underlayment
Metal roofing screws with neoprene washers
Eave trim, rake trim, and ridge caps
Sidewall flashing and valley flashing
Foam closure strips (inside and outside)
Butyl tape and roofing sealant
Roofing vent boots
You’ll need these tools:
Drill/driver with adjustable torque
Aviation snips or metal shears
Hand seamer for bending trim
Chalk line and measuring tape
Safety harness and fall protection
Extension ladder (rated for your weight plus materials)
Metal-cutting circular saw (for panel cuts)
Roof brackets for steep pitches
Safety equipment is non-negotiable: working gloves, safety glasses, non-slip boots with ankle support, and a fall protection system rated for roofing work. Never work alone, especially on roofs over 15 feet high.
Step 1: Measure Your Roof and Order Materials
Accurate measurements prevent costly mistakes and material shortages.
Measure the square footage by multiplying length times width for each roof section. Add 10% for waste and cuts. For a 30-foot by 40-foot section, that’s 1,200 square feet plus 120 square feet for waste—totaling 1,320 square feet.
Measure panel length from the ridge to the eave edge, then add 1-2 inches for overhang. Ordering full-length panels eliminates seams and potential leak points. If your roof runs 28 feet from ridge to eave, order 29-foot panels.
Calculate panel quantity by dividing roof width by panel coverage width. A 36-inch-wide panel typically covers 34 inches after overlap. For a 40-foot-wide roof section, you’d need 15 panels.
Don’t forget trim pieces: eave trim for the bottom edge, rake trim for the sides, ridge caps for the peak, and flashing for valleys, chimneys, and sidewalls. Order 10% extra for mistakes and future repairs.
Step 2: Prepare the Roof Deck
A solid foundation is critical for metal roofing success.
Inspect the deck thoroughly for rot, warping, or loose boards. Walk the entire roof, checking for soft spots that indicate water damage. Replace any compromised plywood or OSB before proceeding—metal roofing over rotten decking is asking for structural failure. For major structural repairs or commercial framing work, professional expertise ensures your roof has a solid foundation.
Check the roof pitch. Most metal roofing manufacturers require a minimum 3:12 pitch (3 inches of rise for every 12 inches of horizontal run). Anything less needs special low-slope panels and additional weatherproofing measures.
Remove old roofing if necessary. While it’s possible to install metal over one layer of asphalt shingles, this approach can hide existing problems. If shingles are curled, missing, or heavily damaged, tear them off completely. This also gives you a chance to inspect and repair the deck.
Install ventilation if needed. Proper attic ventilation prevents moisture buildup under metal roofing. If your current system is inadequate, add ridge vents or install furring strips horizontally across the roof to create airflow channels under the panels.
Clean the surface completely—sweep away all debris, remove protruding nails, and ensure the deck is level. Even small bumps will show through metal panels and can cause installation problems.
Step 3: Install Underlayment for Moisture Protection
Underlayment is your roof’s first defense against water intrusion.
Start with ice and water shield along the eaves, especially important for Long Island’s winter conditions. This self-healing membrane prevents ice dam damage. Install it at least 3 feet up from the eave edge, overlapping each row by 6-8 inches.
Roll out roofing felt or synthetic underlayment across the entire roof, starting at the bottom. Work horizontally, overlapping each row by at least 4 inches. Secure with staples or cap nails every 12-18 inches.
Keep it flat and wrinkle-free—bubbles and wrinkles can create uneven surfaces that affect panel installation. If working on a windy day, roll out small sections and secure them immediately rather than attempting to cover large areas at once.
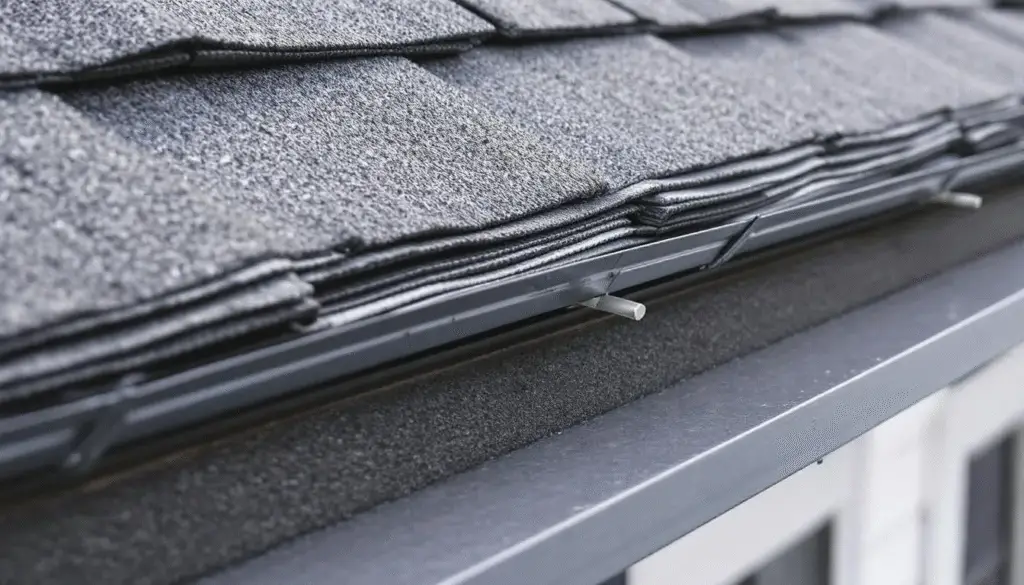
Install drip edge before underlayment at the eaves and after underlayment at the rakes. This metal strip directs water away from fascia boards and into gutters, preventing wood rot.
The underlayment seems simple, but it’s where many DIY installations fail. Take your time and get it right—this layer is your backup if metal panels ever leak.
Step 4: Establish a Square Reference Line
Even one panel out of square throws off your entire roof.
Use the 3-4-5 method to create a perfectly square reference line. Mark 3 feet along the eave from one corner. From that mark, measure 4 feet toward the ridge. From the original corner, measure 5 feet diagonally to intersect the second measurement. This creates a 90-degree angle.
For larger roofs, multiply all measurements by the same factor. A 21-28-35 triangle (7 times larger) works better for whole-house installations and provides more accuracy across longer distances.
Snap a chalk line from your first mark through the intersection point, extending it all the way to the ridge. This line guides your first panel placement—if it’s square, every subsequent panel will be square.
Double-check your work by measuring from multiple points on the ridge to your reference line. All measurements should be identical. Even a 1-inch variation across a 30-foot run creates visible problems.
Step 5: Install Eave and Rake Trim
Trim pieces prevent water infiltration at roof edges.
Bend trim ends closed before installation. Use aviation snips to make 1-inch cuts at each bend, creating tabs. Fold these tabs with a hand seamer to wrap around corners or close gaps. Different trim profiles require unique cuts and bends—follow manufacturer specifications.
Install eave trim first, tight against the fascia board. Fasten with 1-inch roofing nails through the underlayment into the roof deck, spacing nails every 12 inches. In areas prone to ice dams, install eave trim over the ice and water shield for maximum protection.
Splice trim pieces properly where they meet. Cut the bottom hem of the underlapping piece at an angle, apply sealant on top, then slide the overlapping trim piece over it. This creates a watertight seal that sheds water correctly.
Add rake trim along the sides after panels are installed. This creates a finished edge and prevents wind from getting under panels.
Step 6: Set and Fasten Metal Panels
This is where precision matters most.
Position foam closure strips along the eave, about 1 inch from the edge. These strips fill the corrugation gaps, keeping out insects and water. Stick them to panels with butyl tape and run a sealant bead on top before setting panels.
Place your first panel aligned with your square reference line, overhanging the eave by 1 inch for proper water runoff. Check that measurements from panel to reference line match at both top and bottom—if they don’t, adjust now.
Drive screws with the right technique:
- Place screws in flat sections, not on raised ribs
- Space screws no more than 24 inches apart vertically
- Put screws on both sides of each rib at the eave to compress closure strips
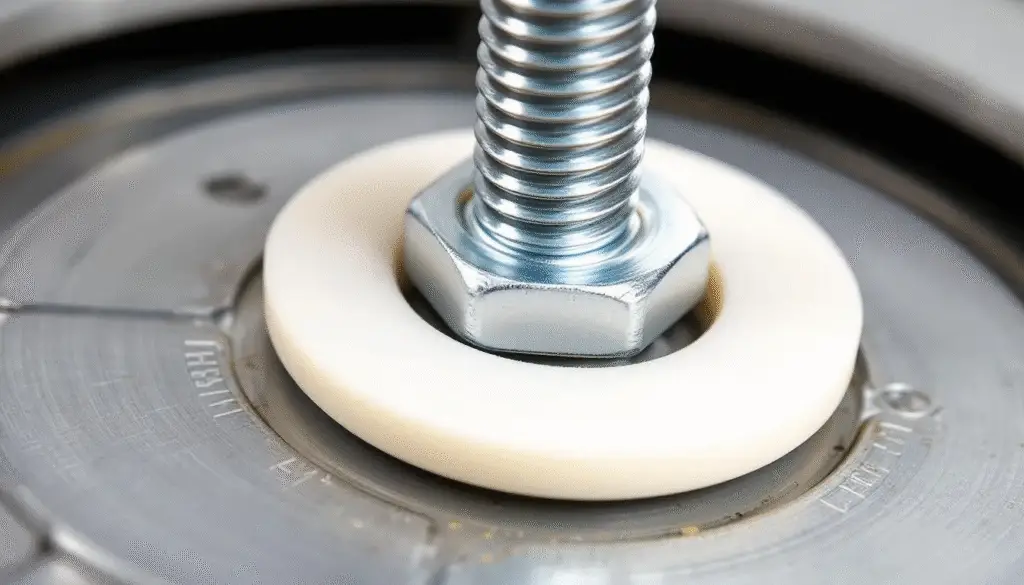
- Tighten until the neoprene washer just compresses to the screw head edge—not beyond
- Drive screws straight—crooked screws won’t seal properly
Overlap panels correctly. One edge has a shorter rib leg that doesn’t contact the roof when laid flat—this is the overlapping edge. The other edge has a drainage channel to prevent water siphoning. Nest these together perfectly, typically overlapping by one full corrugation.
Work from bottom to top in rows, fastening each panel completely before moving to the next row. This keeps fasteners aligned and prevents panel shifting.
Step 7: Install Valley and Chimney Flashing
Flashing prevents leaks at vulnerable intersections.
Valley flashing goes down first before any panels. Use wide (at least 20 inches) pre-formed valley flashing. Seal all edges with butyl tape, then overlap panels onto the flashing by at least 6 inches on each side.
Chimney flashing requires precision. Install base flashing first, tucked under panels on the upslope side and over panels on the downslope side. Add step flashing along the sides, with each piece overlapping the previous by 3-4 inches. Finish with counter flashing embedded in mortar joints or sealed to the chimney with high-quality sealant.
Sidewall flashing goes between the roof and any vertical walls. Install it under the wall’s siding and over the roof panels, creating a shingling effect that sheds water away from the building.
Skylight and vent boot installation follows similar principles—create layered protection that directs water downhill and away from penetrations. Most vent boots designed for asphalt shingles don’t work with metal—order metal-specific boots.
Test your flashing by running water from a hose above each sealed area and checking for leaks below. It’s much easier to fix issues now than after the entire roof is complete.
Step 8: Install Ridge Caps and Final Trim
The ridge is your roof’s most vulnerable point for leaks.
Install outside closure strips with butyl tape about 4 inches down from the peak on both sides. These fill the panel corrugations and create a solid surface for ridge cap attachment.
Apply sealant beads on top of the closure strips before setting the ridge cap. Use a continuous bead—gaps create leak points.
Position the ridge cap to overlap both roof planes equally. Most ridge caps should overhang the gable edge by 1-2 inches. Secure with 2-inch screws through every rib, driving screws into the roof deck (not just the panels).
Install gable trim last to cover panel edges and complete the finished appearance. Apply butyl tape where trim contacts panels, then fasten with screws every 12 inches directly over the tape.
Walk the entire roof one final time, checking that all fasteners are tight, all overlaps are correct, and all trim pieces are secure. Look for any metal shavings or debris—these will rust and stain your new roof if not cleaned off immediately.
Common Metal Roofing Installation Mistakes to Avoid
Overtightening screws is the #1 DIY error. Excessive torque crushes neoprene washers, creating immediate leak points. Use a drill with adjustable torque or practice on scrap panels until you develop a feel for proper tightness.
Skipping underlayment to save time or money creates a roof that leaks the moment a fastener fails. Underlayment is your insurance policy—don’t skip it.
Misaligned screw rows happen when you don’t use consistent measuring. Crooked screw lines look unprofessional and can indicate panels aren’t properly aligned with structure below.
Inadequate panel overlap allows wind-driven rain to penetrate between panels. Always follow manufacturer specifications—typically one full corrugation for exposed-fastener panels.
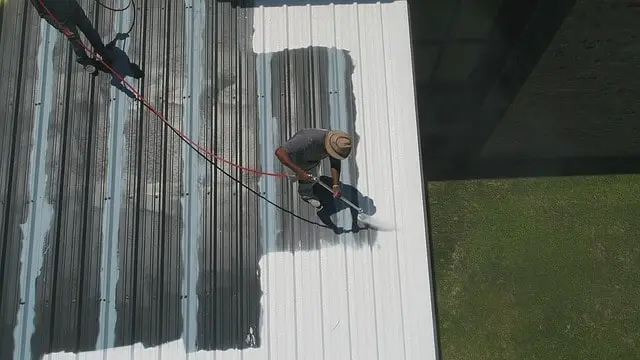
Walking on panels carelessly can dent them, especially corrugated panels. Walk in valleys (low points) or on furring strips when possible, never on ribs or in hot weather when metal is more pliable.
Ignoring expansion and contraction. Metal expands and contracts significantly with temperature changes. Don’t overtighten screws at panel edges, and follow manufacturer guidance on proper screw placement to allow movement.
Metal Roofing Over Existing Shingles: Pros and Cons
Installing metal over existing shingles saves removal costs and landfill fees. It’s also faster and creates less mess.
This approach works when:
You have only one layer of shingles
Shingles are flat and in decent condition
Local building codes permit it
The roof deck is sound with no soft spots
Ventilation is adequate or can be added
Skip the overlay and tear off when:
Shingles are severely curled, cupped, or damaged
Multiple layers already exist
The deck shows signs of water damage or rot
Proper inspection isn’t possible with shingles in place
If overlaying, install furring strips horizontally across the roof every 24 inches. These create a level surface and improve ventilation. Screw strips through shingles into rafters, then attach panels to the strips rather than directly to shingles.
When to Call Professional Roofing Contractors
DIY makes sense for:
Simple gable roofs on sheds or garages
Single-story structures with easy access
Experienced DIYers comfortable with heights
Projects where time isn’t critical
Professional installation is essential for:
Two-story homes or steep-pitch roofs (above 6:12)
Complex roofs with multiple valleys, dormers, or skylights
Standing seam systems requiring specialized tools
Projects where warranty coverage is important
Situations where mistakes could be costly
Commercial and industrial buildings that require specific code compliance
Long Island building codes may require permits and inspections for residential reroofing. Professional contractors handle these requirements and ensure work meets local standards.
County Roofing Systems has installed metal roofing throughout Long Island for over 35 years. Our team understands local building codes, coastal weather conditions, and proper installation techniques that prevent long-term problems. We use premium materials from GAF, CertainTeed, and other leading manufacturers, and we back our work with comprehensive warranties.
How Long Does Metal Roof Installation Take?
DIY installation timeline varies dramatically based on experience and roof complexity. An experienced DIYer might complete a simple 1,200-square-foot gable roof on a shed in 2-3 days. A residential installation with valleys, dormers, and multiple roof planes could take 1-2 weeks.
Professional installation is much faster. Our crews typically complete residential metal roof installations in 2-5 days, depending on size and complexity. We have specialized equipment that makes panel handling safer and faster, plus decades of experience that prevents costly mistakes.
Weather delays are inevitable on Long Island. Never install metal roofing in rain, snow, or high winds. Wet underlayment, slippery panels, and panels catching wind can all create dangerous situations.
Metal Roofing Maintenance for Long Island Homes
One of metal roofing’s biggest advantages is low maintenance requirements.
Maintaining a metal roof comes down to:
- Inspect twice yearly—spring and fall—looking for loose fasteners, damaged panels, or debris accumulation. Coastal locations should inspect more frequently due to salt air exposure.
- Clean gutters regularly to prevent water backup that can work under roofing edges. Debris-clogged gutters are the leading cause of fascia damage on homes with metal roofs.
- Check fasteners every 2-3 years. Thermal expansion and contraction can gradually loosen screws, especially on exposed-fastener systems. Tighten any loose fasteners immediately.
- Remove debris promptly—fallen branches, leaves, and especially metal shavings from installation. Metal shavings rust and stain panels if left to sit.
- Trim overhanging branches that could fall during storms and dent panels. While metal roofing is durable, heavy branches can cause significant damage.
- Address leaks immediately. Metal roofing leaks are almost always caused by failed flashing, loose fasteners, or damaged sealant—all of which are easy to fix if caught early but can cause major damage if ignored.
Get Your Metal Roof Installed Right the First Time
Installing metal roofing yourself is possible, but it’s not a beginner project. The complexity of achieving watertight seals, the dangers of working at height, and the risk of voiding warranties make professional installation the smart choice for most Long Island homeowners.
County Roofing Systems brings 35+ years of metal roofing expertise to every Long Island installation. Our team handles everything from permit acquisition to final inspection, and we guarantee our work with industry-leading warranties. We understand Long Island’s coastal climate and install your roof to withstand decades of nor’easters, summer storms, and salt air exposure.
Don’t risk a leaking roof or voided warranty trying to save on installation costs. Call County Roofing Systems today at (631) 608-5757 for a free estimate on professional metal roof installation. We’ll help you choose the right material for your home, handle all the details, and install your roof correctly the first time—so it lasts for generations
0% financing
No income check
Up to 15 years
Monthly payments as low as $149
Call or Contact Us Today for a FREE roofing estimate: